

I finally cracked the flow of starting / stopping Netcode, with or without Relay, with all potential failure cases handled:
(click image to view full resolution)
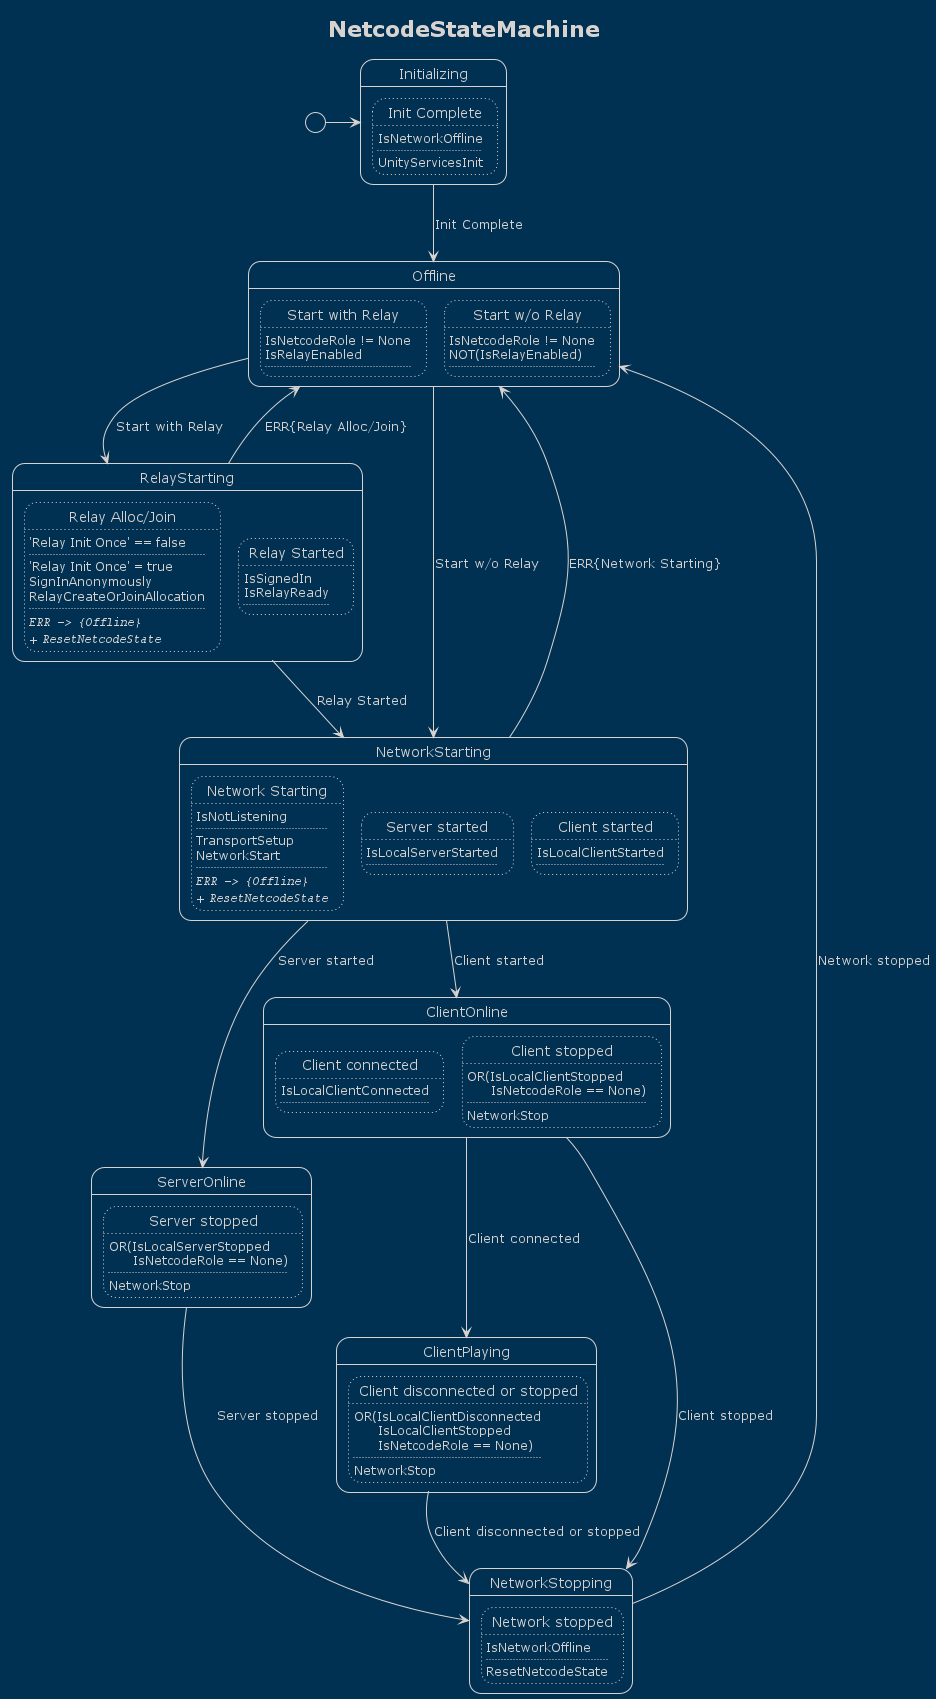
I only needed to write a Statemachine system (read how that came to be). Not from scratch but from memory what I had created 20 years ago and refined over several years. Then I just had to add a PlantUML dump.
It was totally worth spending two weeks on this! 😊
In this article I’ll explain how the Statemachine works, and in the next I’ll dive into the actual Netcode within the Statemachine. In the future, I’ll aim for writing shorter, more frequent articles.
Table of Contents
Statemachine Introduction
Already know what a Statemachine is? Feel free to skip this section.
In a Statemachine (SM), logic is divided into multiple States (S) where only one State is active at any given time.
A State is a container for Transitions (T). Transitions contain Conditions (C) that, if all its Cs are satisfied, execute the Transition’s Actions (A) and may optionally change the active State.
I will use the SM/S/T/C/A abbreviations to shorten the text here and there.
Conditions and Actions are lightweight classes, often containing very little code (you’ll see soon). Cs return a truth value while As can run any code – including awaitable methods. They’re C# classes implementing either ICondition, IAction, or IAsyncAction.
My Statemachine has equatable variables (BoolVar, IntVar) and a Var<T> type for complex data. They are simple container classes. These variables either have local (SM) or global scope.
Variables can control the flow of the SM as well as any other condition. They’re also used to exchange (complex) data with the outside code.
“Running” the SM can be done in Update() or FixedUpdate(), or in a coroutine, on a timer, at an interval – it’s totally up to you. This allows for time-interleaved SM updates to spread the load.
By default, the SM update stops evaluating the active State’s Transitions every time a state-changing T activates. This prevents fast-tracking through several states.
Alternatively, the SM can stop as soon as it reaches a State where, after updating all Ts, there was no state change. This allows for multiple State changes in a single update but might cause an infinite loop (safeguarded, logged).
Statemachine Benefits
The main benefit of programming in States is reduced mental load!
Anything goes wrong in a particular State? You only need to focus on that State’s Transitions and its C/As. Whatever the issue may be, it cannot be hiding just about anywhere. This immediately narrows your focus close to the issue’s origin.
In addition, computational cost is limited to only the Cs that the active State evaluates, and possibly a few of its As.
The other major benefit is that you will program modular Cs and As. Much of that code is trivial. The more complex code still typically fits entirely on your screen.
With these building blocks, which can extend to combining multiple C/As and even entire States with transitions. Programming and debugging efforts tend to scale down over time.
One last thing to consider: the detailed implementations (C/A) and the flow of logic (SM, S, T) are clearly separated. Meaning you mentally switch between lower and higher levels of implementation.
For those like me with ADD this clear focus is a productivity boost.
Statemachine Code Examples
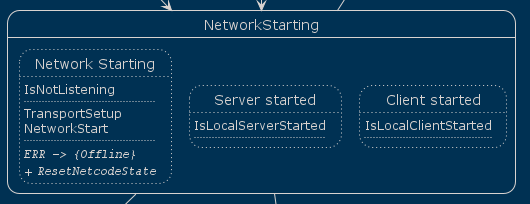
The Statemachine diagram at the top looks like this as C# code:
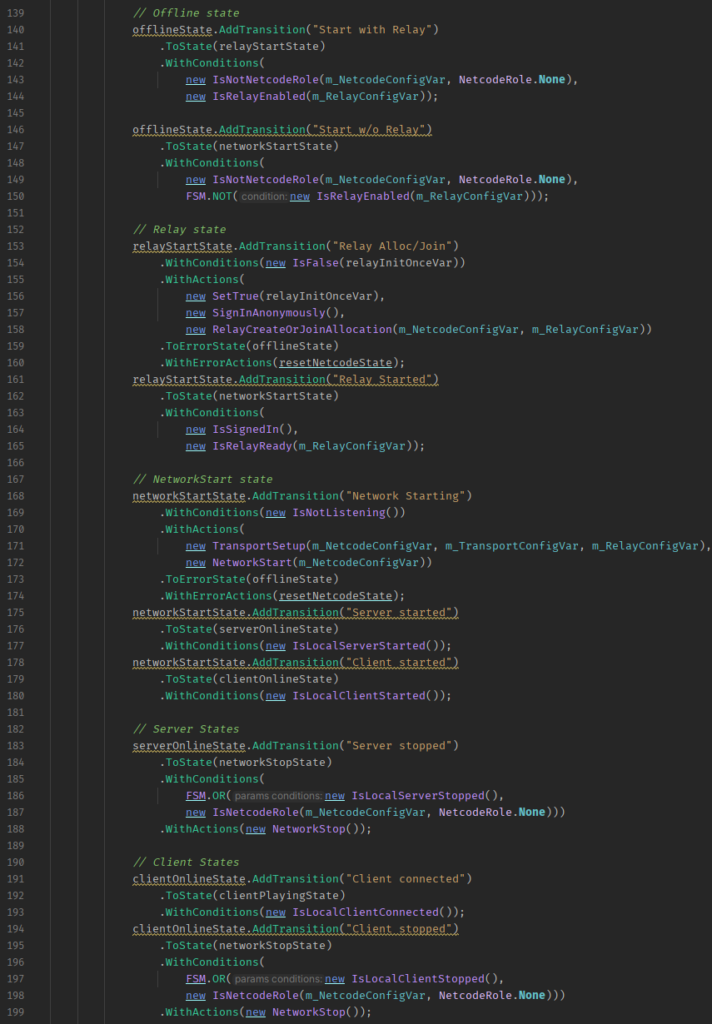
I couldn’t fit all lines in the shot. You can review the full code here.
It may take a moment to let this kind of logic click, not unlike LINQ (which is way, way more obtuse). There’s no ifs and elses nor trys, catches, and whatnots. But you can read this out loud:
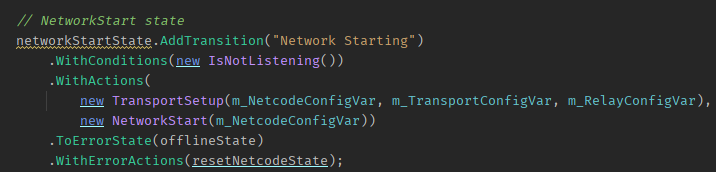
If the Condition(s):
IsNotListeningis/are satisfied, then execute the Action(s):
TransportSetup
NetworkStart
Try to find this transition in the screenshots above as an exercise.
I’m aware that IsNotListening is ambiguous. I may refactor at a later time, perhaps to IsNetworkManagerNotListening (Bad boy!). I strive towards brevity first, disambiguation when the (expanding) context requires it.
Creating States
The Netcode Statemachine creates states from an existing enum by using Enum.GetNames():
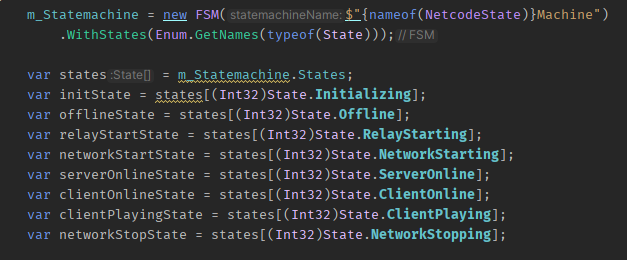
Just supplying a list of strings is possible, too. I opt for an enum for type safety and it’s just easier to work with than const string fields.
Adding Transitions To A State
Pick one of the State variables from above, and call AddTransition:
LINQ-alike you can neatly chain calls. Most are optional. It is not necessary for a transition to specify a “goto” state – that makes it a self-transition and should be guarded against repeat execution.
Omitting Cs in a Transition will make the T to be always true.
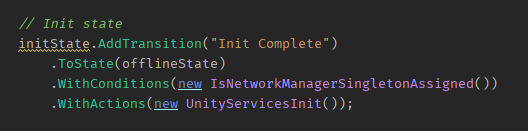
You can nicely read this block of code from top to bottom:
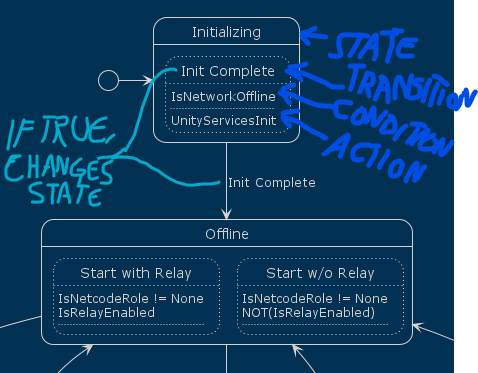
The initState transitions to offlineState if the condition IsNetworkManagerSingletonAssigned() is true. If so, execute the Action UnityServicesInit().
Did you notice? The diagram lists IsNetworkOffline as the condition for this transition, which includes a NetworkManager null check. But while writing, I decided to create a separate condition just for clarity, as I often do.
Transition Exception Handling
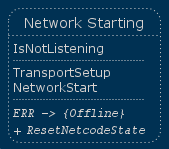
You may have noticed that some Ts have a ToErrorState and WithErrorActions:
These are used for error (read: Exception) handling. If either of the above two Actions were to throw an exception, the T activates (goes to) the error state instead and executes the error actions. Error actions will typically need to reset variables.
Note that Conditions are required to catch all and not throw any exceptions. Instead, the C must always return a truth value. The logic flow of the SM should not be interrupted by exceptions.
In the above SM, many Cs use NetworkManager.Singleton which is initially null. Using IsNetworkManagerNotListening as the very first C in the very first State allows me to avoid try/catch this potential issue in all NetworkManager conditions.
If, however, you were to read a file’s contents in a C then any exception, like permission or file not found, needs to be caught within the C so that it returns false in such cases. Exception logging is recommended, at least during development.
There is still the issue of informing outside code of an error. For example, the GUI may need to inform the user about a connection failure. It’s under consideration.
Order Of Execution
Unless “random logic” is used anywhere within the Cs or As, the SM logic is fully deterministic by default.
Each State’s transitions are evaluated in order. Here in the diagram they are ordered from left to right:
In C# code, the execution order is from top to bottom.
Conditions are combined using logical AND by default. The first C which returns false ends the T’s evaluation. This is the same early out behaviour that the C# compiler performs.

Later I’ll explain other logical operators for conditions.
If the Actions execute, they too run from top to bottom. This is just as important as we’re ordering statements in C# code:
You wouldn’t start networking without configuring the transport.
Naming States And Transitions
A State is usually ongoing. Whereas a Transition encodes a fact that happens at a specific point in time.
Therefore I prefer to name States with the -ing suffix (present progressive) wherever it seems feasible, such as:
- Initializing
- RelayStarting
- ClientPlaying
- NetworkStopping
Exceptions include Offline and Online states because frankly we know that these are ongoing continuously, and often too damn long.
Contrast this with Transitions where I prefer to use past tense:
- RelayStarted
- ClientDisconnected
- NetworkStopped
- Init Complete(d)
Transitions encode the thing that just happened, or happens momentarily. Verbs work fine in some cases, as in “complete” vs “completed” but may sound awkward eg ClientDisconnect.
I also use <object-adjective> (ClientDisconnected) rather than <verb-object> (DisconnectClient) because the object we act upon has greater importance. The adjective signals that we’re altering one of the object’s attributes.
Declaring Variables
Variables allow you to control the flow of the Statemachine where you need custom variables. You also use them to pass runtime modifiable data into Cs and As.
All variables inherit from the abstract VariableBase class. The base class provides default equality checks.
Variables need to be defined on the SM before use:

The Vars property is where SM scoped (local) variables are stored. There’s a corresponding GlobalVars property that all Statemachines share.
Global vars should be used with care but they can make communicating with other SMs easy. Global vars allow relaying information without an event system. It is best to prefix all global vars to avoid name clashes.
Speaking of which: Variables are indexed by name, with nameof(T) being the default for Var<T> types. Once a var is defined, you should prefer to use the returned instance rather than string indexing for obvious reasons (typos).
A benefit of storing variables within the Statemachine: at any point in time you can explore or dump all the SM’s variables without having to use the debugger.
Conditions & Actions
The modularity of Conditions/Actions is part of what makes a Statemachine system so wonderful. The C/A code tends to be minimal, and on the logic level you’ll work with a relatable keyword like IsLocalServerStarted.
Conditions
IsLocalServerStarted for instance is a relatively complex condition. It subscribes to three events: start, stop, failure.
Since events will occur outside the Statemachine update, it merely updates its private bool field based on these events occuring:
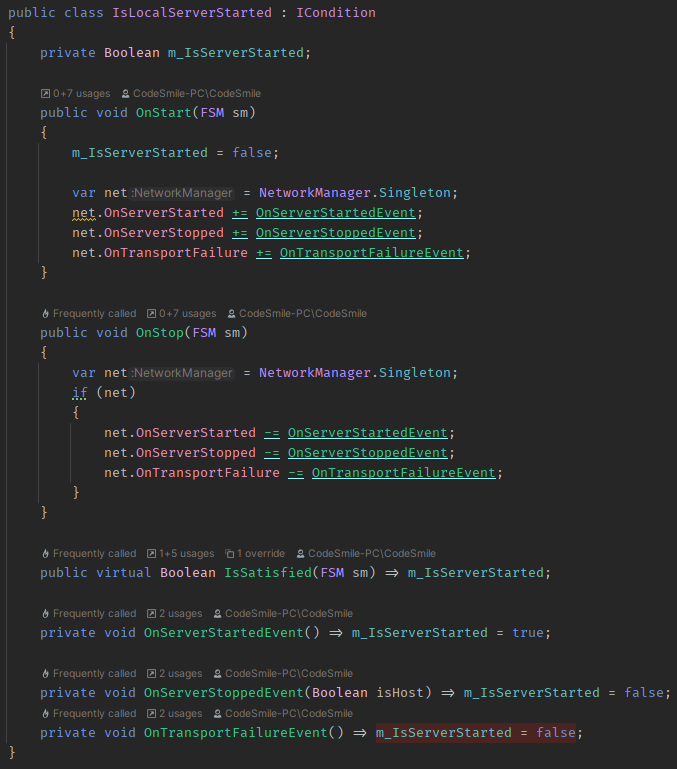
About transport failures: this calls NetworkManager.Shutdown, whether you want to or not!
So if you’re not handling transport failure events in your code, this won’t just end the session for the user but likely leave the app in an unusable state, still considering the player to be connected.
Handling Transport failures within this Condition as part of its state avoids having to specify extra “failure” Transitions in the SM.
Logical Operators For Conditions
Enclose Cs with FSM.OR to combine the contained Cs with logical OR, where the first C that’s true ends evaluation:
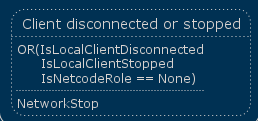
The code for this is:
It may sometimes help to improve performance by merely reordering Cs for both AND and OR. The same is true for C# conditionals of course.
It’s best to check the C that’s “least likely to be true” first – unless perhaps if it’s heavy-weight. And the C that’s consuming the most CPU cycles should be checked last.
I always cringe seeing the simplemost bool (that’s almost never true) being the last one checked in a complex conditional. 🫤
You can do even fancier logical combinations – if absolutely necessary – by nesting two FSM.AND within a FSM.OR. You also have FSM.NAND, FSM.NOR and FSM.NOT available.
To NOT or Not To NOT
While you can negate any C by using FSM.NOT(condition) I find that readability is improved when there’s a separate negated C.
The difference in readability to me is obvious:
FSM.NOT(IsSatisfied)IsNotSatisfied
There’s two ways to implement a negated condition:
- subclass, override
IsSatisfied, return negated result of the base classIsSatisfied - duplicate class, negate the conditional, best for one-liners:
return !NetworkManager.Singleton.IsListening
Complex negated conditions should take the subclass approach. This is how IsLocalServerStopped does it:

For simple conditionals like IsNotListening, the negated C would be a separate class that does the same check, but negated:

Variable Conditions
For variables of type BoolVar, IntVar and FloatVar exist several Conditions as you’d expect.
IsEqualIsNotEqualIsGreaterIsGreaterOrEqualIsLessIsLessOrEqual
All of these accept a VariableBase as input and a value or another VariableBase as the compare value.
For BoolVar there are shorthand Conditions to avoid writing them verbosely as IsEqual(variable, true):
IsTrueIsFalse
These only take a single VariableBase parameter as input.
As I said earlier, these classes are named as brief as possible. Perhaps I will have to refactor them eventually towards IsVarEqual. For now there is little ambiguity.
Actions
Let’s have a look at an Action, like the generic LambdaAction:
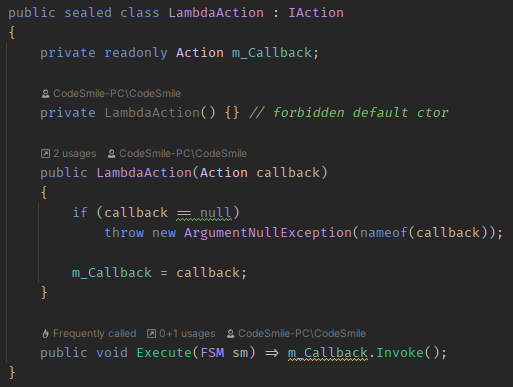
The LambdaAction is intended for quick prototyping and once-off actions, since it’s not reusable. This simply invokes the System.Action that was passed into its ctor.
An Action’s Execute can run any code that “does something” – be it changing a variable value or calling a method. It should however only rarely use conditionals as the conditional logic should preferably be expressed through the SM itself.
Compound Conditions/Actions
A CompoundCondition or CompoundAction combines multiple C/A into a single, named action. This is great for brevity, readability (code, logs, diagram), and to prevent copypasta of the same As. Remember: DRY!
For example, ResetNetcodeState seen earlier is a CompoundAction used in multiple places. This resets any variables that need resetting when we go offline, be it unexpectedly or deliberately:

It’s like defining a ResetNetcodeState() method.
Awaitable Actions
Now what about actions that need to be awaited? We obviously have to handle these when starting a Relay connection:
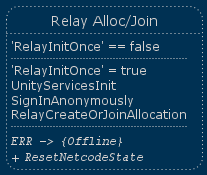
To prevent the Relay Alloc/Join Transition to run repeatedly while awaiting, the RelayInitOnce bool var is used to toggle the transition off after it activated once.
On first T activation, both SignInAnomymously and RelayCreateOrJoinAllocation are being awaited – one after the other, and both taking some time to complete.
The SignInAnonymously Action implements the IAsyncAction interface returning a Task:
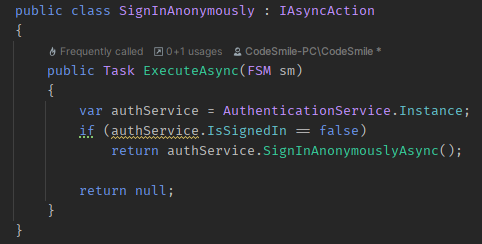
The Transition knows it needs to await IAsyncAction instances:
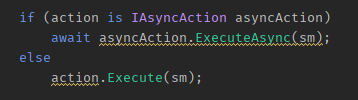
The SM will receive multiple updates while an IAsyncAction is awaited. This has to be accounted for in the SM logic. Consider that the SM is polling every update: are we done yet? Are we done yet?
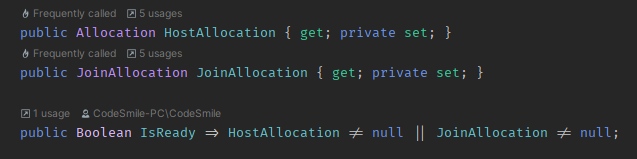
Looking at the entire state, you’ll notice that ‘Relay Started’ has corresponding Conditions:
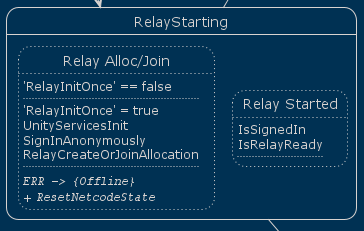
Here, since we’re merely checking the IsSignedIn bool and IsRelayReady also only checks if the HostAllocation or JoinAllocation field in the RelayConfig struct is non-null, checking those repeatedly is not a performance concern:
I suppose all IAsyncAction can be checked for completion with a similarly simple conditional. Thus there is currently no need for IAsyncAction completion events.
In all failure cases during Init, SignIn or Relay allocation, this will trigger the error handling part of the Transition.
Variable Actions
Of course we’ll need to modify variables. There exists a set of Actions that perform the usual mathematical operations:
SetValueAddValueSubValueMulValueDivValueIncValueDecValue
All of these take a variable as input and another variable or a value as the operand.
And once more, shorthands for BoolVar specifically:
SetTrueSetFalse
These only take a BoolVar as input.
Summary
That’s all you need to know about the Statemachine implementation I wrote. The SM code is here (GPL3 License).
I hope this wasn’t too distracting but I plan on using the SM system for many other things. Consider player authentication for instance:
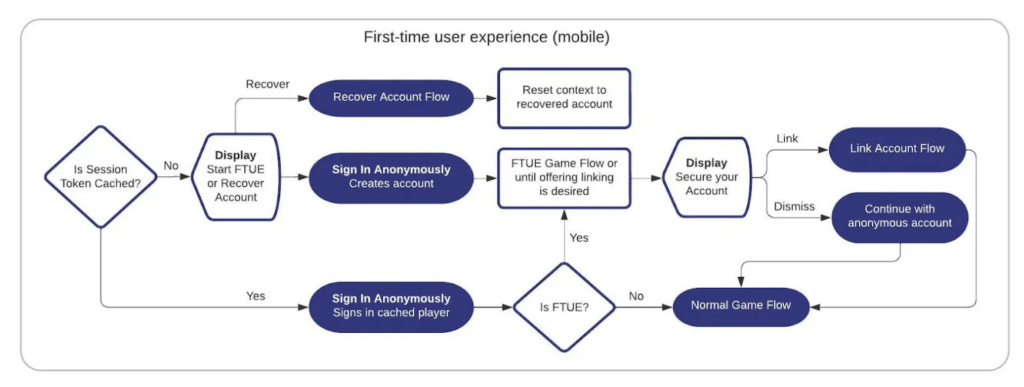
You can see right away how that is best handled with a Statemachine. And that graph isn’t even including error handling, token expiration, unlinking an ID provider or account deletion.
Next …
Continue reading with 5. Netcode With Relay
Return to the Write Better Netcode Overview
Source Code on GitHub (GPL3 License)
Join my Patreon – it’s free! Get the latest updates by email.
Leave a comment below if you have any questions or feedback!
Leave a Reply