

I create all Unity GUIs with UI Toolkit and UI Builder because it’s so easy to use and powerful.
In comparison, UGUI (GameObject-based GUI) is extremely clunky and cumbersome to edit – it always was but now that we have a better option UGUI feels so archaic …
You’ll see that UI Toolkit basics are simple and straightforward.
Table of Contents
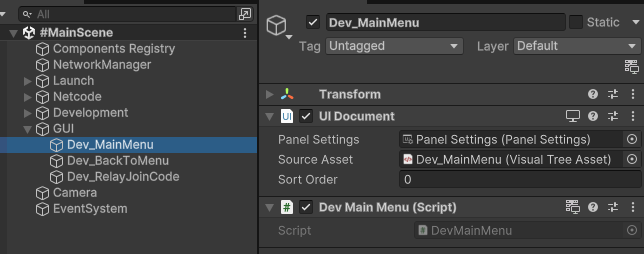
GUI In The Shell
I created three GUI objects in the scene for the development GUI. Each with a UI Document component and a custom script:
Main Menu Functionality
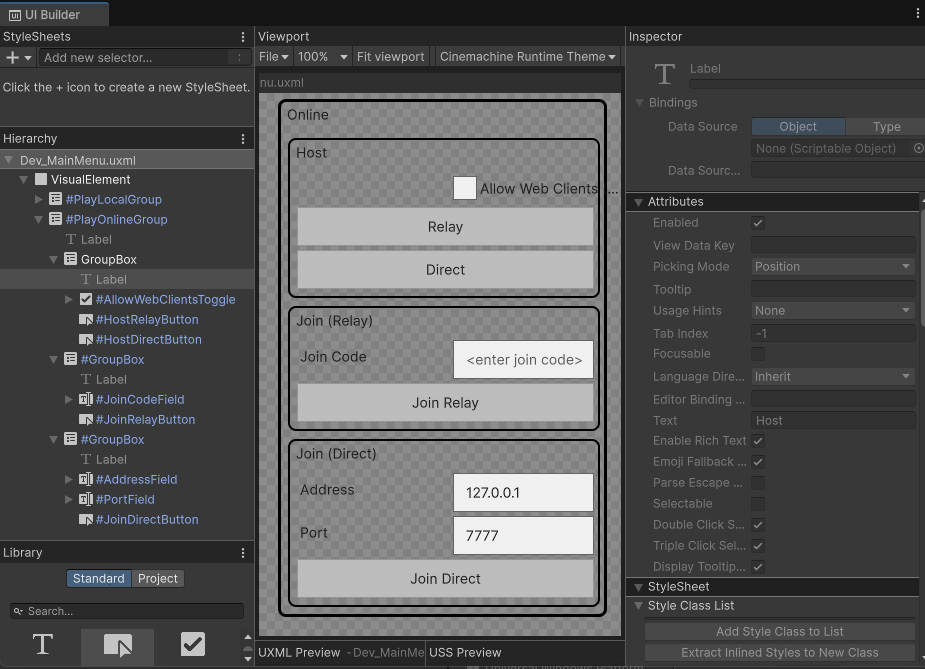
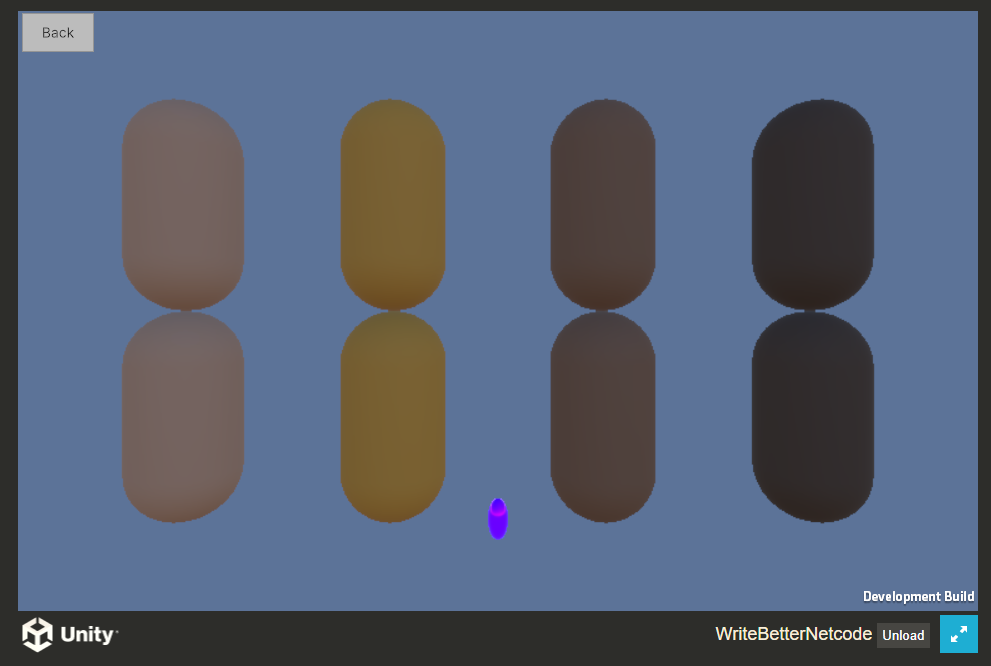
The main menu looks like this in UI Builder:
In the game this is what you see on a 4:3 aspect ratio screen:
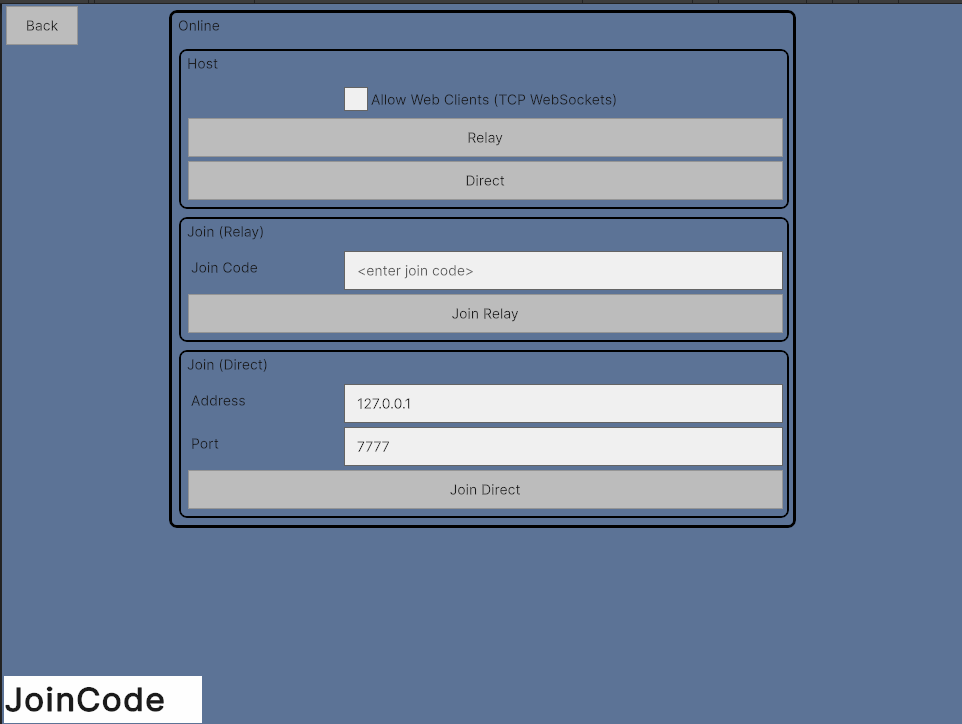
This menu enables a user to host a game with or without Relay. WebSockets can be enabled to allow web clients joining the game.
The default settings are taken from NetworkManager, such as the port or whether to use encryption, then overriden by any command line arguments.
As a client one can join a Relay session by entering a Join Code, or join directly by entering the host’s IP address and port. In a web build, the client will automatically have WebSockets enabled so there’s no need for a checkbox.
I even added simple validity checks for the text fields, where red letters indicate an incorrect or incomplete entry. More on that later.
Playmode Behaviour
By entering playmode without any tags assigned to MPPM players the main menu shows up. But if we do assign MPPM tags, MPPM takes precedence and the game directly starts a network session.
This is the part of the automated behaviour I strive for. There’s not a single line of code that says “if MPPM .. else ShowGui()”. The Main Menu GUI simply auto-hides when the “went online” event fires, regardless of who initiated “going online”.
Main Menu Code
The whole code for the main menu, including validation checks, is well under 200 lines. It’s not particularly densely formatted either.
Accessing GUI Elements
Simplicity rules, so for this dev menu I ignore any and all efficiency concerns in favor of dense, readable code. Or generally, until proven (profiled) to be an issue.
I added a private property for every GUI element that we reference:
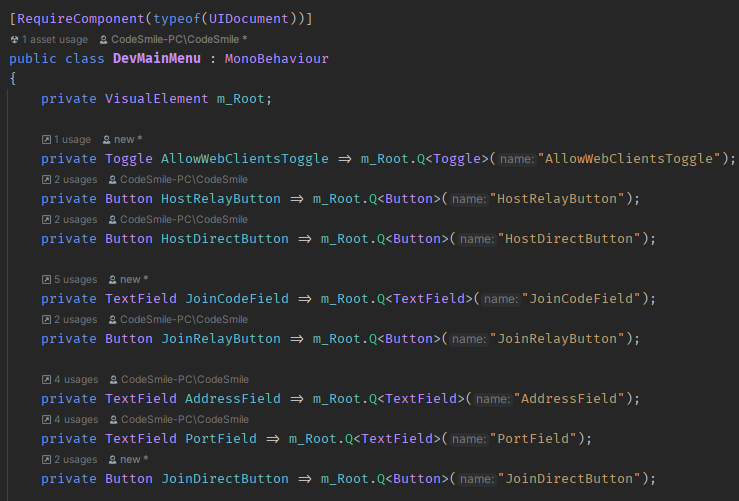
Every time we need a reference to the JoinCodeField, it just queries the UI document for a TextField with that particular name. We don’t do this frequently so that’s totally acceptable.
Awaking The Menu
In Awake I assign the UIDocument‘s rootVisualElement to the m_Root field for convenience. More importantly, the hosting elements are disabled if we’re in a web build:
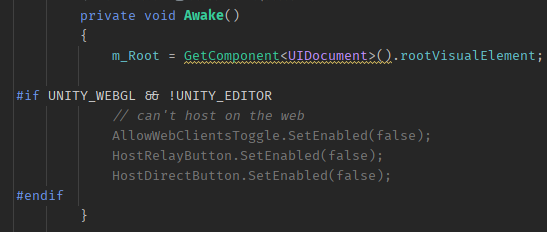
I still leave hosting in the editor enabled. We may want to launch a host or server in the editor even though our current platform may be set to WebGL (means: UNITY_WEBGL is defined).
Online/Offline Toggle
In Start and OnDestroy we hook into the NetcodeState‘s Statemachine events which tell us when the game went online and offline:
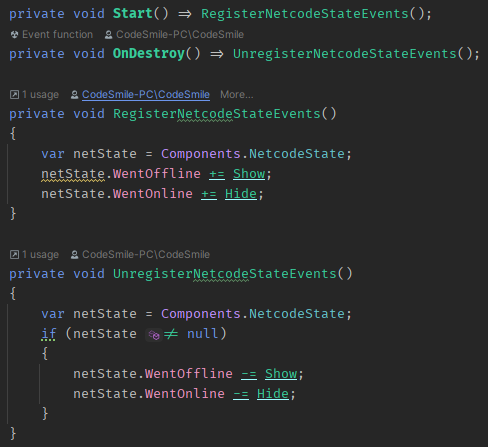
Recall the Components Registry? If not, click the link.
The WentOffline and WentOnline events are new additions to the NetcodeState SM:

I simply use LambdaAction to invoke a public event Action field in specific places of the SM. You’ll see some of these LambdaAction event actions used in the first three states:
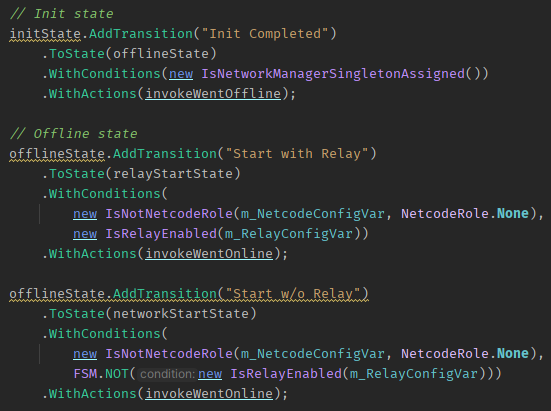
Since the SM runs over multiple state changes in a single update, it’s possible that WentOnline and WentOffline may get called in the same frame – that’s okay! In fact, it’s desirable since we won’t see the Main Menu flash visible for a frame when launching through MPPM or CmdArgs.
Speaking of which … I haven’t posted the event callbacks Hide() and Show() yet:

It’s the UI Toolkit way of showing/hiding a GUI without actually disabling its functionality. The GUI elements remain in memory but won’t render anymore.
Note that the Show() and Hide() methods won’t cause the component’s OnEnable/OnDisable to run since they only change the document’s display style.
Here, whenever we go online the Main Menu hides, and if we go offline the Main Menu is visible again. It does not matter whether we failed to go online, or manually ended a successful online session, or ran into a transport failure – all work the same way.
Registering GUI Events
I find it best practice to register and unregister GUI events in the OnEnable and OnDisable pair. We could then disable the component to still render the GUI but make it non-functional if we needed to.
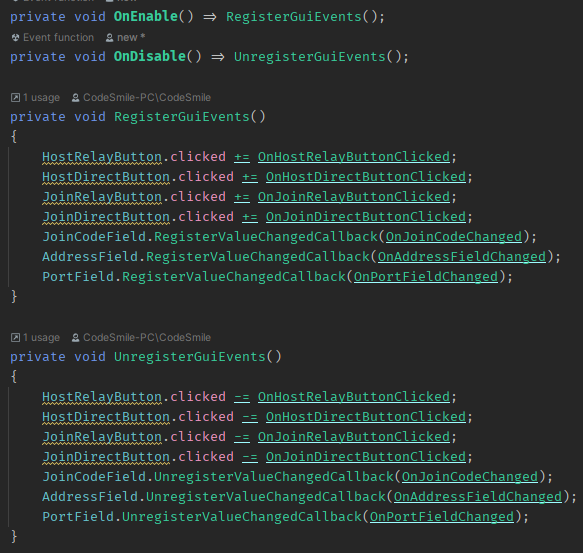
As you can see, buttons have a clicked event that we can subscribe directly to. Other elements have similar shorthands for often-used events.
You can also use the RegisterCallback function to subscribe to any event that the given element supports – perhaps even to unsupported ones, that then never fire …
Anyhow, refer to the UI Toolkit Event Reference to see all events.
Validating User Text Input
A quick general word about user-supplied text input, because it’s so often completely neglected.
Validate! Validate! Validate!
Whenever you give the user the ability to provide input to your code, it is of utmost importance that you validate the input before acting upon it!
Depending on the context, this can even have security implications (eg code injection).
But more common are runtime errors … you didn’t expect the user to NOT enter anything? Your code doesn’t check for a null or empty string? Oh my.
And then there’s the third class: insane amounts of data.
Imagine you would not limit the text field for a player name, so one player enters the complete works of Shakespeare. Well, whatever can happen, will happen!
Suddenly you’re sending megabytes of useless data to all clients, only to render millions of characters on their screens. If it ain’t crashing, it’ll be slow and ugly. But hey, at least those gents learneth some fusty english.
Feedback To The User
But there’s also the part about informing users whether their data entry is correct or malformed. Be nice to your users!

Poor-Man’s Validation
I only went with the poor-mans validation by changing the text color – after all it’s a dev GUI:
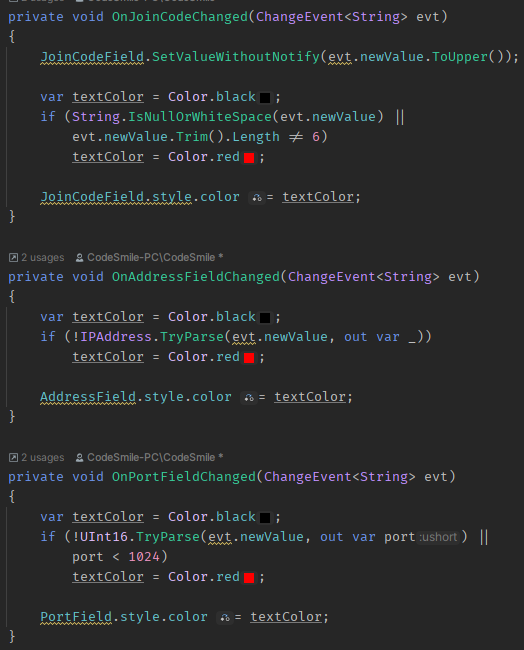
For the join code, I only check for empty strings and the string’s length must equal to 6. More importantly, and commonly missing, is ensuring that the text entry leaves no room for doubt – the Relay code is always in uppercase, thus uppercase the user’s entry as he typeth!
To validate the IP address I reached out to the built-in IPAddress.TryParse method. This works okay but it isn’t perfect since it’ll also parse “127.0.0” as a ‘correct’ IP address.
I did not bother with a ‘must have three dots’ check since I may extend that text field to support domain name entry at a later point.
Lastly, the port is parsed as a UInt16 (ushort) and the number must be 1024 or higher – this isn’t a strict requirement but a best practice since ports 0-1023 are reserved for “well-known ports”.
If you wonder why I use UInt16 over ushort, it’s a setting in Rider’s code cleanup feature where all ‘classic’ data types are converted to official .NET types. I prefer those because they better and most accurately reflect what the types are, like Single/Double vs float/double and Int16/Int32/Int64 vs short/int/long. Although I’m perfectly familiar with the classic data types, I feel the modern type names add more consistency to my code and make it more .NET-esque.
Start As Host
When the user clicks on either of the Host buttons (Relay or Direct), the StartHost method runs:
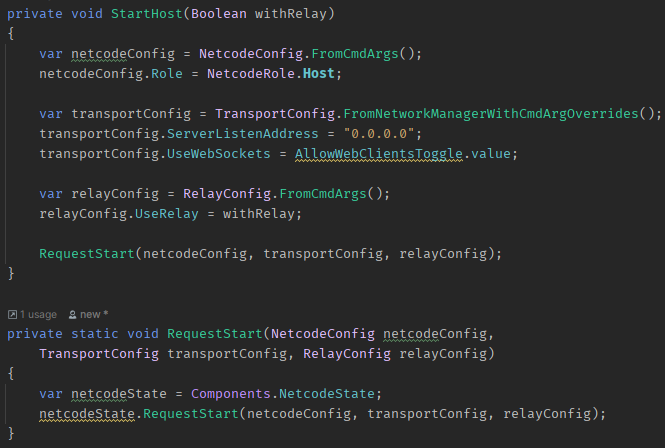
You’ve seen similar code in the last article. It creates an instance of each of the NetcodeConfig, TransportConfig and RelayConfig data objects with default values the same as the command line.
This prevents the GUI from completely overriding any command line parameters. For example, if you want to test the app with encryption enabled you can specify this on the command line but still use the GUI to start matches.
Accept All Incoming Connections!
Very important for hosting is to specify “0.0.0.0” as the ServerListenAddress. This means incoming connections through every network interface will be accepted. For instance if the machine has both Wifi and LAN like many modern computers.
But more important is the default value – omitting the ServerListenAddress will only allow local connection, meaning the ServerListenAddress will default to “127.0.0.1” – the source of many frustrated Netcode user’s connection problems.
The RequestStart method will be used by the client GUI as well.
Join As Client
Both Join Relay and Join Direct buttons each call a respective method which merely apply different settings:
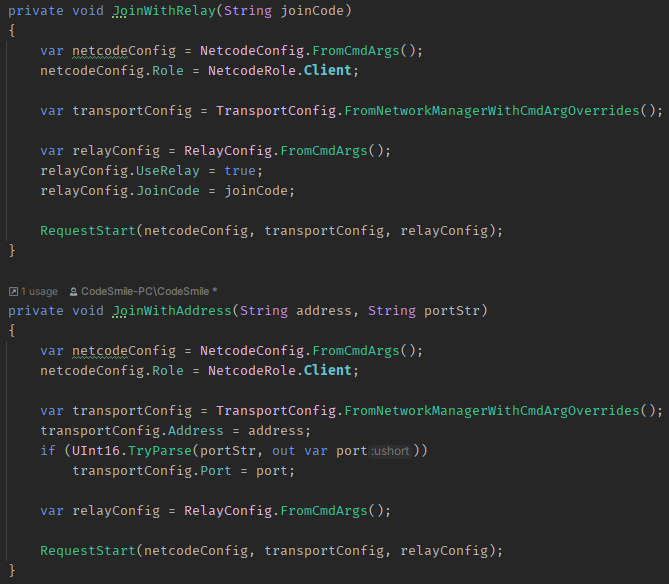
Notice how JoinWithRelay assigns the JoinCode field to RelayConfig. But we needn’t modify the TransportConfig.
Whereas JoinWithAddress leaves the RelayConfig at defaults but applies the text fields’ contents to the Address and Port fields.
In both cases error checking is minimal, any malformed join code, address or port will fail to make a connection. Still, we automatically return to the main menu, with any errors logged to the Console respectively editor.log/player.log files.
For an actual GUI, at least a popup message should inform the user about a connection failure and ideally with a failure reason.
Since we had merely hidden the menu, the previous text entries are restored rather than scrapped when the menu comes back. It’s best not to annoy your users (and yourself!) by thinking ahead like this!
Back To Reality
You may have noticed this little Back button here:

This automatically appears when the WentOnline event is fired, and disappears with WentOffline. Exactly the opposite of what the main menu does.
I made the Back button as a separate UI Document that contains largely the same setup as the Main Menu except for the button callback:

This merely sets the NetcodeConfig‘s Role field back to None:
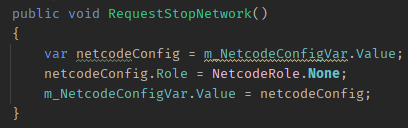
In effect, this causes the Statemachine to return back to the Offline state. In doing so, the WentOffline event is invoked too, thus automatically hiding the Back button and showing the Main Menu again.
Where’s The Join Code, Waldo?
When the Host starts a game with Relay, we need to enable the Host to forward the join code to clients. This is what the DevRelayJoinCode does.
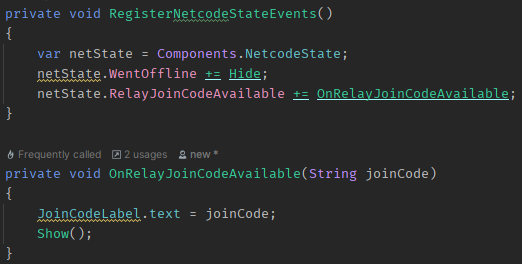
It registers with the NetcodeState‘s RelayJoinCodeAvailable event, and when that fires the join code is displayed in the label and the label is shown.
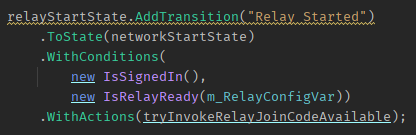
In NetcodeState I added the tryInvokeRelayJoinCodeAvailable action to the Relay Started transition:
The action calls this method:
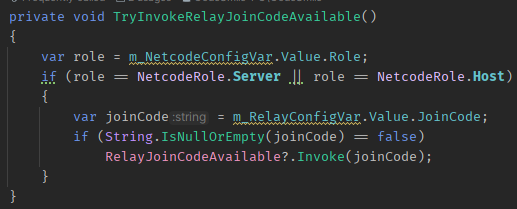
The RelayJoinCodeAvailable event should only get invoked if we’re the Server or Host, otherwise we’d also invoke the event after a client had entered a join code and tries to start connecting through Relay.
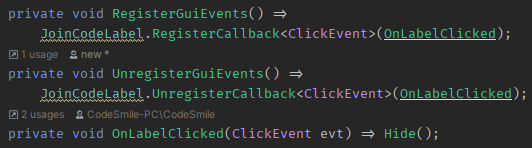
Since the Host doesn’t need this join code label all the time, he can simply click it to dismiss the label:
It’s simple things like these that are often really easy to implement yet aren’t because a programmer didn’t care enough about the user’s needs. At the very least if it’s personally annoying, do fix it!
WebGL Tests
With this setup I was able to make a WebGL build and verify the web client can connect successfully by entering the Relay code.
There was one issue that I hadn’t anticipated, namely this:
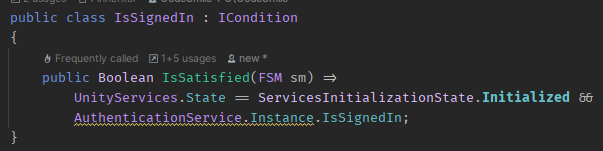
On the desktop, the awaited UnityServices.InitializeAsync method returned instantly. But on the web it did not complete after a little time, therefore the AuthenticationService.Instance in IsSignedIn was throwing an exception.
Thus the added safeguard checking for the services’ state.
Test Builds Early And Frequently!
It’s things like these why it’s so important to test builds on all targeted platforms as early as possible, and as often as needed (eg major changes or additions).
Otherwise, if you’re facing a dozen of these small issues, you can easily spend a lot more time debugging and fixing these since you don’t know which issue may be connected with another.
Or it’ll be very frustrating because you fix one thing, and then the next bug appears. Or a previous one comes back (a so-called regression).
Next …
Read on with 8. … tbd
Return to the Write Better Netcode Overview
Source Code on GitHub (GPL3 License)
Join my Patreon – it’s free! Get the latest updates by email.
Leave a comment below if you have any questions or feedback!
Leave a Reply