

After I explained the Statemachine system in-depth in the previous article, it’s time to deep-dive into code details and the overall flow of the Netcode Statemachine:
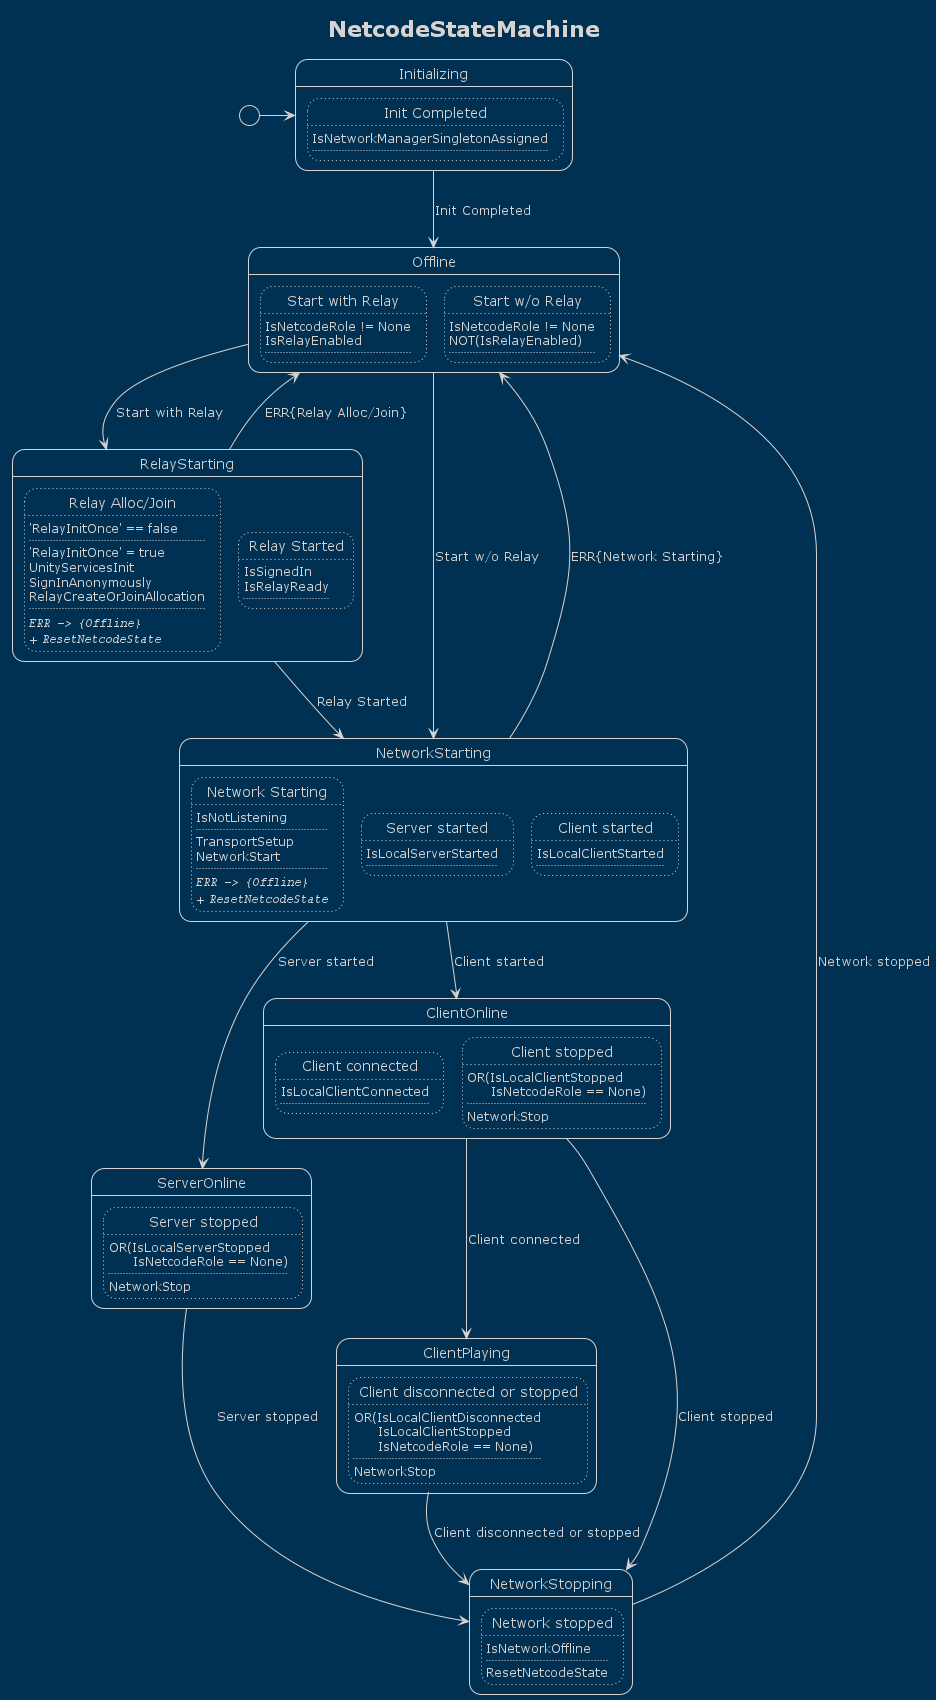
Table of Contents
The Netcode Statemachine
I’ll walk you through each State, and its Conditions and Actions. I’ll also provide rationale why this Statemachine helps to write better, safer code.
If I had to sum it up, I’d point to the graph above. In my experience, it allowed me to follow its logic visually, which is incredibly helpful!
I found loopholes and optimization opportunities much more easily than if the flow were dispersed throughout textual C# code. I was able to condense the initially “designed” logic to (my best guess) 30% less after two cycles of “Oh, I don’t need to handle this separately!”.
This improved the readability and reduces the potential for issues.
The NetcodeState MonoBehavior
The Netcode Statemachine is in the NetcodeState component which I’ve added to its own GameObject. This is a pattern I frequently use.
Rather than cramming multiple components on the same object, I prefer to have one object per component for the sort of “central” components. This makes locating the component easier and let’s you focus on just that component’s properties in the Inspector.
Fields
We only need a reference to the Statemachine, and the configuration objects (structs with data) for some of the Conditions/Actions:
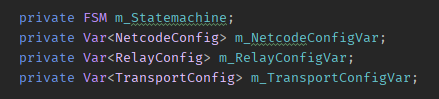
These “config” types are part of the C/As that use them. You can consider them data transfer objects to exchange data (state) between the Statemachine and outside code. I’ll detail those later.
Initialization
Upon Start, the new FSM() is instantiated with a name (required) and WithStates which is simply a list of strings:
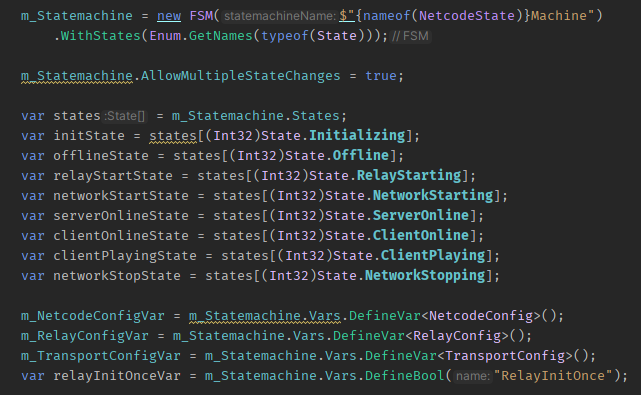
I also allow the SM to perform multiple state changes in quick succession to avoid adding unnecessary latency. I was careful to avoid any looping back and forth between two states.
Since the State’s names were taken from an enum, I can then assign each FSM.State instance to a local var for readability.
I also define the config vars and assign them to their fields, as well as adding a “RelayInitOnce” flag used to prevent a transition from activating repeatedly.
Defining States
Just take any state variable and call AddTransition to create a transition in that state:

The name makes reading and debugging the SM easier, but other than that it has no purpose and could be omitted. For more details on the SM setup, read the previous article.
Start Your Machines
After we setup the States and Transitions, we have to call m_Statemachine.Start() once and only once to initialize it.
The Start() method verifies the integrity of the Statemachine and tries to find any logic loopholes, such as unused States or Transitions which want to activate a State that’s not in the SM.
Start() also calls the OnStart() event method in all Conditions and Actions, if implemented. The IStatemachineEvents interface provides a default no-op implementation. OnStart() and the corresponding OnStop() can be used to perform once-only initialization or disposal.
The MonoBehaviour equivalents would be Start() and OnDestroy().
Then the first state is set active, firing the OnEnterState() message for that particular state. There is of course a corresponding OnExitState() and these can be used to perform, you guessed it, code that may be needed to set or clean up the Condition/Action.
These may get called repeatedly, so their MonoBehaviour equivalents would be OnEnable() and OnDisable().
The States Of The Machine
Now let’s check each State and what it does in detail.
Initializing
The Initializing State exists to avoid any execution order issues:
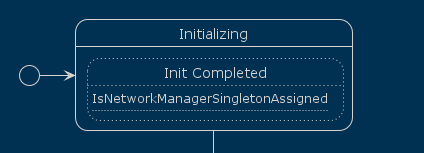
The NetworkManager.Singleton instance isn’t created until the component’s OnEnable ran. Thus the Statemachine waits until after that occured, if necessary.
Note: If you add a component to the same object as NetworkManager and call GetComponent<NetworkManager>() you can get the NetworkManager reference even in Awake. But doing so provides no guarantee that the NetworkManager is actually initialized.
Offline
The Initializing State moves to the Offline State:
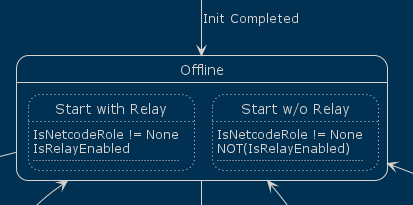
Here we’re waiting for a network connection to be initiated through code outside the Statemachine, be it a GUI button or the command line or Multiplayer Playmode.
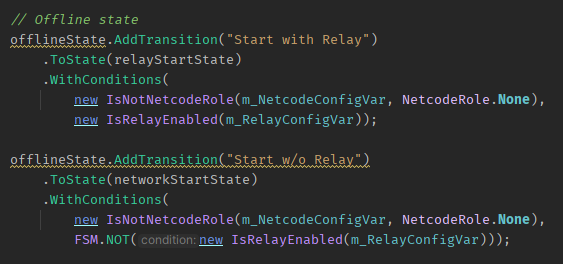
Here’s the SM setup code for the Offline State:
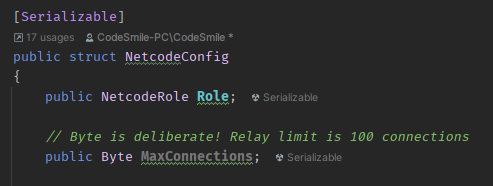
NetcodeConfig
Whichever way we start, it’s assumed that it will change the Role field of the NetcodeConfig variable to anything other than None:
This is the NetcodeRole enum:
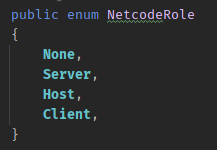
The None role simply signals that we have no role assigned. This is also used to end a session if the role gets reset to None.
The IsNetcodeRole condition is, as most are, rather simple. I’ll provide this one as an example but I’ll omit posting others that are similarly simple as this one:
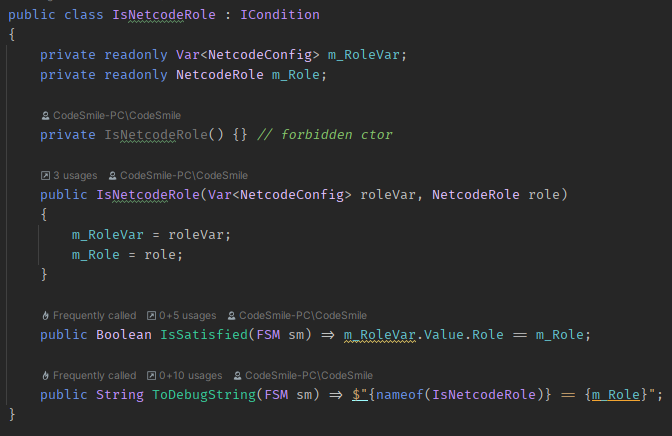
Theoretically, I could have also used an IntVar but .. what role is 3? And then having to cast an enum to (int) .. not very readable.
It’s exactly because parameters like these are often related that I created the various config structs so I can easily add more fields.
IsRelayEnabled?
Lastly, the IsRelayEnabled condition simply checks if the UseRelayService bool is set in RelayConfig. We’ll get to that.
If we don’t use Relay, the Offline state moves directly to the NetworkStarting state. But let’s assume we intend to use Relay, in that case we take a small detour to the RelayStarting state.
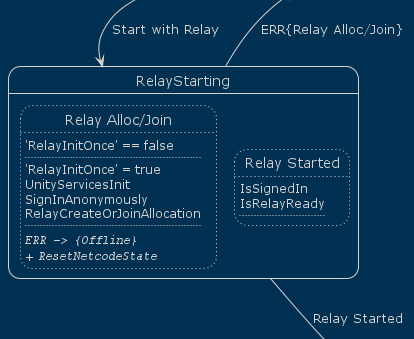
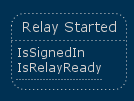
RelayStarting
In here, we’re simply making the necessary Service calls to initiate a Relay connection, either as a Host (Create) or as a Client (Join):
This is the corresponding C# definition:
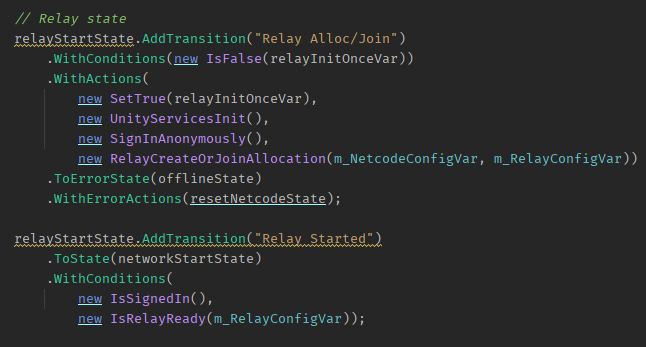
The relayInitOnceVar toggles true to prevent repeatedly activating the Relay transition. This var gets reset back to false in the compound action resetNetcodeState which runs when we’re either leaving the RelayStarting state or stopping the session.
Note that we need this safeguard because this is a self-transition: it doesn’t change State. And we also won’t be leaving this State for several more Statemachine updates.
SignInAnonymously
I’ll just skip the Services initialization because it’s trivial. Instead, we focus on SignInAnonymously:
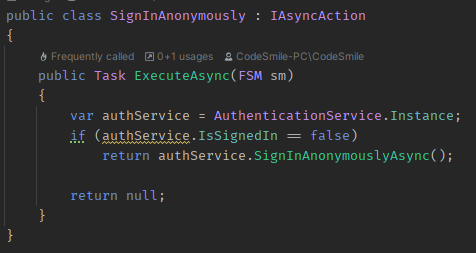
Since it implements IAsyncAction it has to implement the ExecuteAsync method returning an awaitable Task. Here it simply returns the Service call’s Task.
It is crucial to check whether we’re in the position to make a Service call. If we’re already signed in, we don’t need to sign in, and we actually can’t .. because trying to sign in while being signed in will throw an exception!
On the other hand, it’s safe to assume that the AuthenticationService.Instance is non-null. If the UnityServicesInit call would have failed (and it can!) then the Transition would already have activated the Error state and won’t even get to execute the SignInAnonymously Action.
Relay: Create Or Join
The Relay code is trivial. It would complicate the SM if we had to add Transitions checking our NetcodeRole – therefore RelayCreateOrJoinAllocation makes this decision internally:
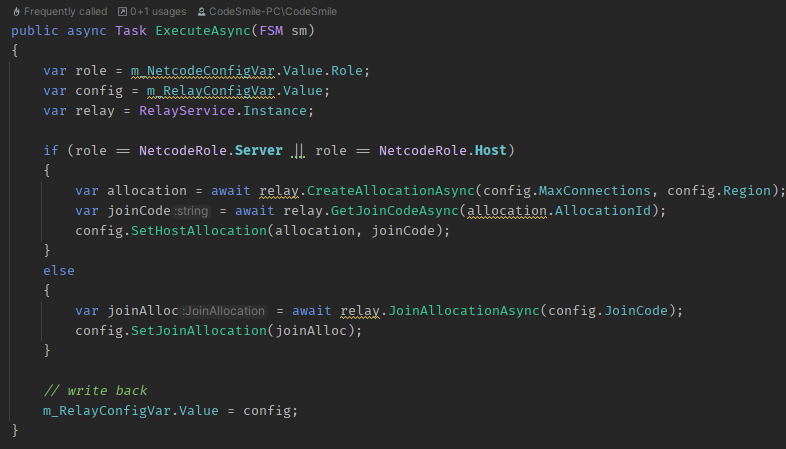
The NetcodeConfig‘s Role is used to decide whether we host or join. The RelayConfig has corresponding methods to set a host or join allocation, which will null the respective other allocation to make sure we don’t hold onto an old one unnecessarily.
The RelayConfig has these fields:
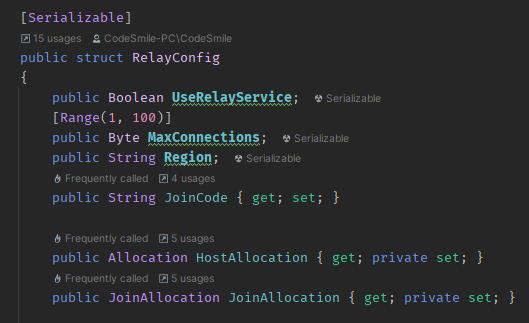
The JoinCode field will later be used to present it to the host user for sharing. For now, we just move that data from the service calls into RelayConfig and call it a day. Some other code will make use of it.
Again, we needn’t worry about exception handling within the Action because the Transition takes care of this for us.
Waiting For The Awaitables
Let’s quickly focus on the Transition that leads out towards the NetworkStarting state:
It’s obviously waiting for both the user being signed in and Relay being readied. But why?
The reason are the awaitable ISyncAction with the Service calls. In a single Statemachine update, we began awaiting three calls: UnityServicesInit, SignInAnonymously and RelayCreateOrJoinAllocation. These will be awaited for several Statemachine updates since at least the latter two send and receive network messages.
Hence the waiting, but also the RelayInitOnce var to prevent these Actions to run on every update while we’re in RelayStarting.
Note that technically we needn’t check for IsSignedIn as that is a prerequisite of IsRelayReady becoming true. Still I found it best to express that we’re waiting for both to succeed.
And yes, strictly speaking there ought to be an AreServicesInitialized condition. I took the middle ground.
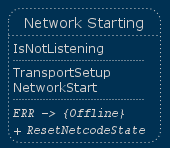
NetworkStarting
Now that Relay is ready we move to the NetworkStarting State. And if we weren’t using Relay we’d already gotten here directly.
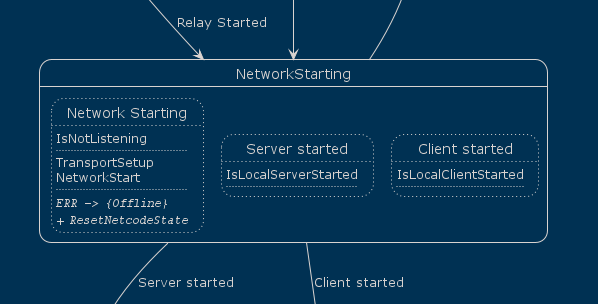
This is what it looks like in the Statemachine setup code:
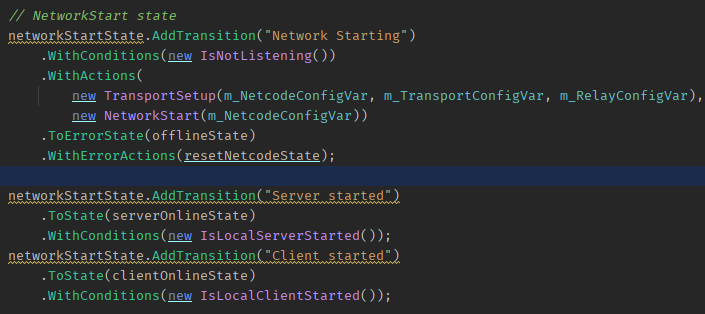
Let’s start with the misnomer: IsNotListening. Aren’t we all?
Listening is a technical term for having an open network connection. I might just rename it to IsOffline but that’s also pretty vague. IsListening is a NetworkManager flag that is set true the moment you call StartServer, StartHost or StartClient.
Which we do after TransportSetup.
TransportSetup
This Action is responsible for configuring the Transport. I want to handle all common cases: with or without Encryption, WebSockets, Relay and who knows what else – all in a single, reusable Action:
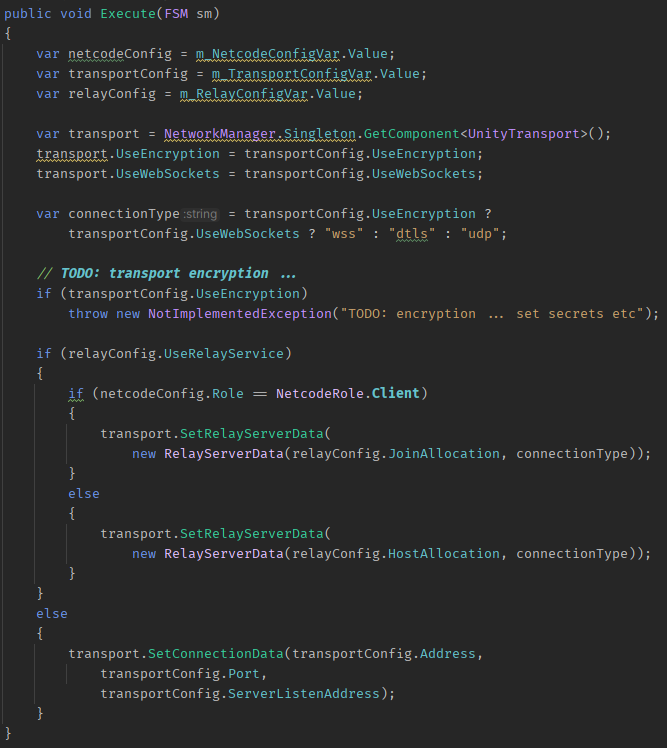
Encryption is not yet implemented. But adding that will be trivial and non-disruptive since only data needs to be added to TransportConfig and the corresponding strings (secrets, certificates) applied. No Statemachine changes needed.
With encrypted WebSockets, the connection type must be “wss”. That’s the simple double ternary in the code. What a lovely phrase: simple double ternary. 🤓
For the rest, the code checks if we’re using Relay or not. With Relay, it calls SetRelayServerData with either Join or Host allocation. Without Relay we merely set the Address, Port and Listen Address.
Pretty neat and simple once you decompose those Transport calls.
The ServerListenAddress needs to be set to “0.0.0.0” if you want your server, be it dedicated or host, to be reachable by clients. Not using this third parameter is a common source of “client’s can’t connect to the host / server” issues because SetConnectionData has made that third parameter optional, with the default being interpreted as “127.0.0.1” (localhost). This will allow only client connections from local processes, and fails if the client is not on the same machine.
NetworkStart
With the Transport configured, we can now start networking:
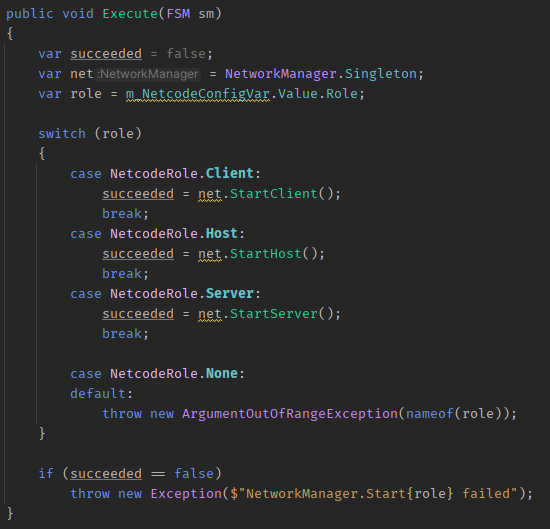
Based on the NetcodeConfig Role we call the appropriate Start method. The only curiosity, and often overlooked fact, is what happens when a Start method returns false?
What, StartXxxx can fail? Yes, absolutely! Although rarely but good production code ALWAYS considers every possible failure point to occur and handles it accordingly.
Here, I deliberately throw an Exception if start networking failed, to cause the exception handling in the Transition to get triggered. Otherwise we could be deadlocked in the NetworkStarting state.
Error Handling
And that is why the ToErrorState and ErrorActions exist in the Network Starting Transition:
Any error (exception) activates the offline state and executes the compound Action ResetNetcodeState. This ensures that the role is None again and any Allocation in the RelayConfig var is null’ed:

Now, if an error were to happen, we can simply start over again.
Pro Tip: Always handle all expectable Exceptions! More precisely, every I/O operation – be it File I/O or Network I/O – may fail and REQUIRES exception handling without exception nor excuses!
Started: Server Or Client?
Assuming everything went okay, we still have these two Transitions that lead us out of the NetworkStarting state:

They activate the ServerOnline or ClientOnline states, respectively. Also note that if we’re playing as the Host, logically speaking we’re the Server. The Netcode Statemachine has no need to distinguish the Host separately from the Server.
Both Conditions look alike, here’s the IsLocalClientStarted:
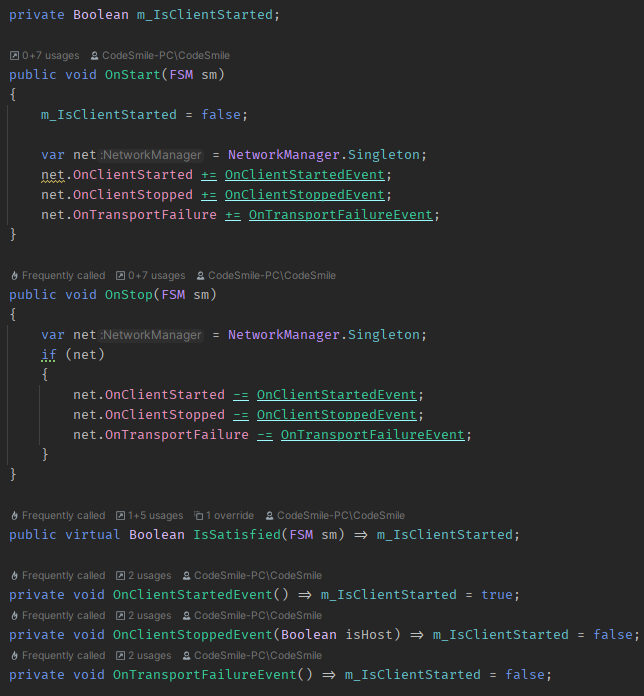
Do note that the transport failure event shuts down NetworkManager, so it has to be handled in this Condition because this will also stop the client.
Now we don’t have to separately handle a Transport Failure anywhere within the Statemachine – it’s just a sort of automated “Stop” event that we automatically handle. We don’t get any information other than “transport failure” which we might relay to the user generically phrased as: “connection interrupted”.
I’m a fan of telling the user what the situation is in a way that he understands. Avoid technical developer jargon. We may understand what a transport failure is, while the user doesn’t even know what a Transport is (Beam me up, Scotty?).
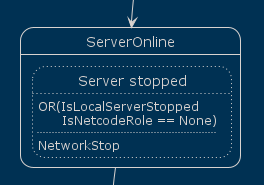
ServerOnline
Let’s assume we started a Server and it got started, then we’re in the ServerOnline state:
The corresponding State setup:
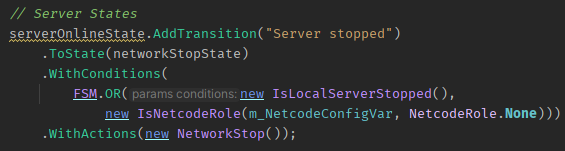
Since NetcodeState is only about handling the transition between online and offline, we don’t need to do anything but to wait for the session to end.
For the server this happens either when IsLocalServerStopped (remember: this is also the case if we encounter a transport failure) or when some outside code deliberately set the NetcodeRole field back to None to end the session.
NetworkStop
If either case becomes true, we execute NetworkStop. This simple Action merely calls NetworkManager.Shutdown:
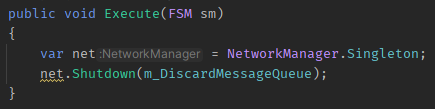
Note that NetworkManager ignores the Shutdown call if it’s currently shutting down or already shut down. So we’re safe to call this regardless of the current NetworkManager state.
I try to double-check such behaviours. Fortunately, we can just navigate into the corresponding code since NGO is open source.
ClientOnline
The client is a bit more involved. Once the Client is online, it still needs to wait for its connection to be approved:
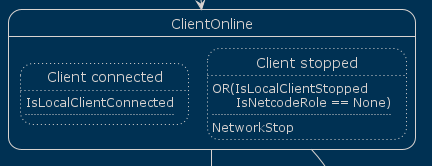
While waiting for the connection, the client could be stopped, either due to a transport failure or by manually cancelling the connection. That’s why we also handle Client stopped here. I won’t repeat this code because it’s effectively the same as for the Server.
While writing, I discovered that I have a loophole here: the case of a client getting rejected via connection approval is not handled. In such a case, a ClientDisconnect event is received. The likely course of action is to create a condition that checks if DisconnectReason is non-null in the disconnect event.
IsLocalClientConnected
This condition is similar to the Started/Stopped conditions as it hooks into NetworkManager’s OnConnectionEvent:
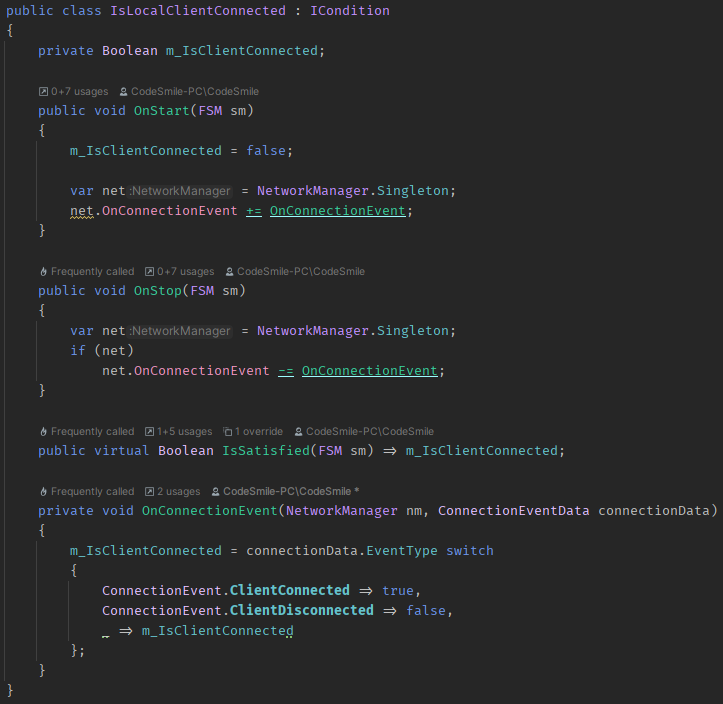
This waits for ClientConnected and ClientDisconnected events and sets the m_IsClientConnected flag accordingly.
Only notable thing is that we use the convenient switch expression style available since C# 8.0. The latter underscore part just assigns the existing value – seems odd but otherwise I’d get a warning the the switch “does not handle all possible inputs (it is not exhaustive)“.
ClientPlaying
Once the client is connected, we move to the ClientPlaying state:
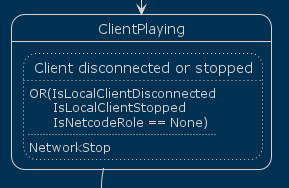
This is essentially the same as the ServerOnline state. The only difference is the additional IsLocalClientDisconnected condition. This might become true if the client gets kicked by the server.
Just like for the Server, we call NetworkStop if one of these conditions combined with logical OR becomes true. If so, we move to the NetworkStopping state.
NetworkStopping
In NetworkStopping we check whether we went offline:
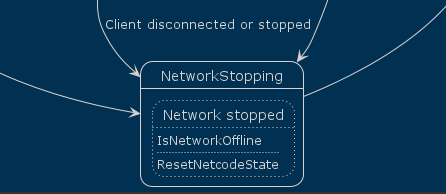
You may be wondering why we aren’t going directly to the Offline state? After all, we did run NetworkStop.
The reason is that Shutdown is not an instant operation!
At least not for the Server (or Host) since the Server has to wait for remaining client messages, and client disconnect events, and possibly a timeout if a client happens to become unresponsive at this very moment.
IsNetworkOffline
To be on the safe side, IsNetworkOffline checks for all possible flags that may indicate whether we’re still not fully offline:
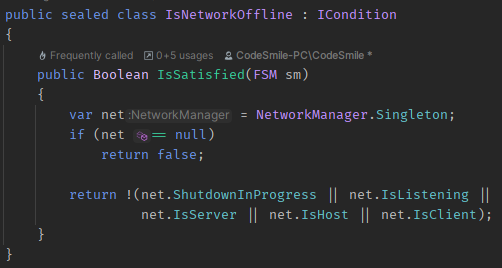
First, if NetworkManager happens to be null, we have to assume we’re offline.
Both ShutdownInProgress nor IsListening were set after a shutdown in my tests, but I’d rather be safe than sorry.
The main indicators whether we’re still in the process of shutting down are the IsServer and IsClient flags which, according to the NGO source code, are reset last.
Only if all these checks pass can we safely assume that we’re fully offline, and thus ready to start a new network session.
A common failure point is to call NetworkManager.StartXxxxx directly after NetworkManager.Shutdown. This just won’t work!
Starting All Over Again
Aaaaaand now we’re back in the Offline state:

It means we’re ready to repeat the same process all over again – either in the same way or differently. With or without Relay, with or without Encryption, as a Server, Host or Client, whether we’re still signed in or not.
The whole loop is entirely handled by the Netcode Statemachine!
Now we can move on to other things. For me, the next steps will be confirming that this works under all conditions, like a Web build.
To that end, I’ll have to add a minimalistic GUI (with UI Toolkit) and perhaps command line parameters before I get to actually spawn network objects.
Next …
Continue reading with ….
Return to the Write Better Netcode Overview
Source Code on GitHub (GPL3 License)
Join my Patreon – it’s free! Get the latest updates by email.
Leave a comment below if you have any questions or feedback!
Leave a Reply