

Table of Contents
The Scene Flow
Now we’re starting with a fundamental concept: Scene Flow.
Let’s talk about when to change scenes and why. And, also …
What’s A Scene, anyway?
The question we never considered to ask:
A scene is a container for content (game objects).
Load another scene in single-load mode and you’re replacing one set of content with another.
Simple and self-understood. Why talk about this?
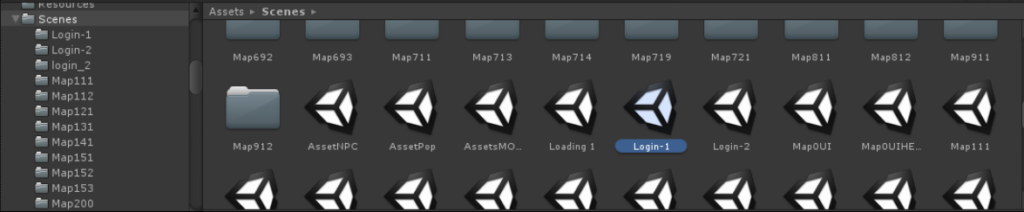
You Create Too Many Scenes!
Because most create far, faaaar too many scenes …
Then they implement awkward, slow, broken solutions to persist state when moving from one (single-loaded) scene to another.
Remember: single-loading a new scene destroys all current objects and components, then instantiates the objects in the new scene.
Some of these objects may be the exact same ones in all scenes!
Persisting State Between Scenes
Every game has these fundamental requirements:
- Global game state persists all the time, is accessible any time.
- Select objects persist for a set duration, but not indefinetely.
Both requirements have known solutions:
There’s actually two more: static fields and ScriptableObject instances. At runtime both can be used to represent global state. Neither of them are scene-related, thus out of scope for this article.
DontDestroyOnLoad (DDOL)
Game objects marked as DontDestroyOnLoad(gameObject); get moved into an aptly named, automatically created DontDestroyOnLoad scene. Such objects will no longer get destroyed when changing scenes.
Good. Except … there’s a pervasive problem: When you load a scene with DDOL objects again. And again. Without extra code this will create duplicates of the scene’s DDOL objects!

You may be tempted to fix this by checking if the object already exists, but even finding the existing instance can already be tricky.
Regardless, any DDOL object will be instantiated again, only to get destroyed again. This is downright awful and error-prone!
CAUTION: Don’t Destroy NetworkManager!
If you don’t own the component’s code, as is the case for NetworkManager, you may even be tempted (or told) to:
Destroy(NetworkManager.Singleton); 😖🤢🤬
🙄Don’t do this!!!🙄
Community feedback has proven numerous times that destroying the NetworkManager leads to all sorts of issues!
Avoid Duplicates With A DDOL Scene
The real slim solution to avoid DDOL object duplication is to have all DDOL objects in a scene that’s loaded only once. Typically the first scene in the build list, the one with build index 0.
From the DDOL or launch or global objects scene you can then immediately transition to the next, actual first scene:
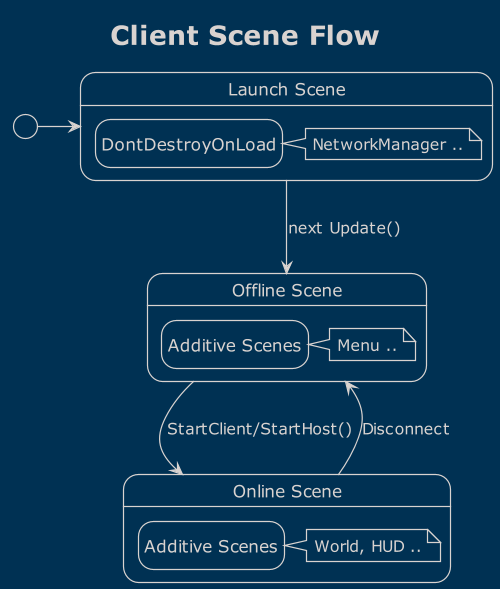
This is what I had implemented in MultiPal but it came with a grievance: you always have to enter playmode through the launch scene.
The solution I’m opting for now is radical. I can tell you that we’re going to go all in. I’ll explain soon but first the prerequisite …
Additive Scene Loading
Sometimes, we need the same game objects in many, but not all scenes. Common example would be the player character and the game’s HUD – both exist in all levels but not in menu screens.
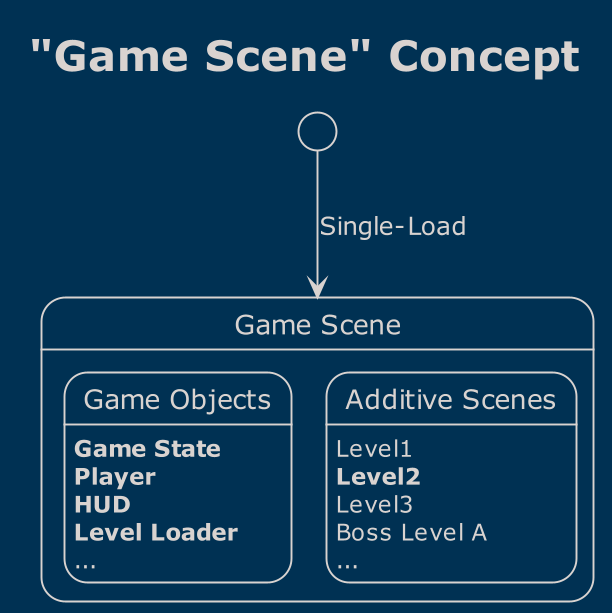
To allow for this, we could assume a “game scene” that merely acts as a container for everything that happens during the game.
This scene contains the global objects that never change, and a system to load other additive scenes, let’s assume they’re “levels”.
Insert “Loading …” Scene
Before we actually start to additively load a level scene, you can first additively (synchronously) load an animated “Loading…” scene.
When the new level has loaded you unload the loading scene again.
With additive scenes, you can start developing without a loading screen, and later introduce a loading screen just by adding these two steps at the start and end of the sequence.
Contrast this with single-scene level loading: You’ll have a headache if you decide to add a level loading screen at a later time!
Additive Level Transitions
How do we move from one level to the next with additive scenes?
We would first call UnloadSceneAsync to unload the current additively loaded level scene – if any.
The next level’s content is loaded additively with LoadSceneAsync.
By default, Unity won’t unload unused assets for additive scenes. By calling Resources.UnloadUnusedAssets we can free up any memory of the previous scene and it’s up to us when to do so.
We have two points in time where we can unload unused assets. We can even decide at runtime which option we prefer: Avoid the memory spike but slower load, or load faster but with a mem spike.
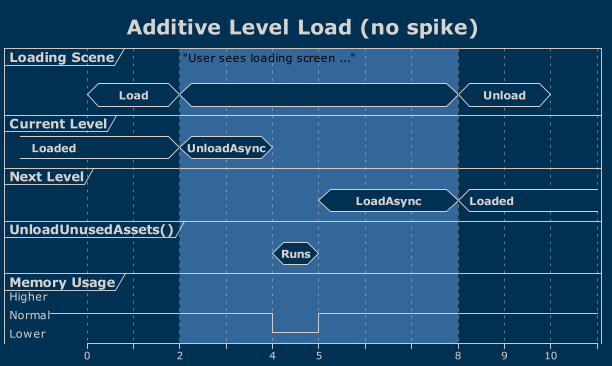
Load Slower Without Memory Spike
By calling UnloadUnusedAssets right after the current scene has unloaded we ensure our memory footprint goes down before we start loading the next level:
Load Faster With Memory Spike
You may want to unload unused resources only after the new level has loaded instead:
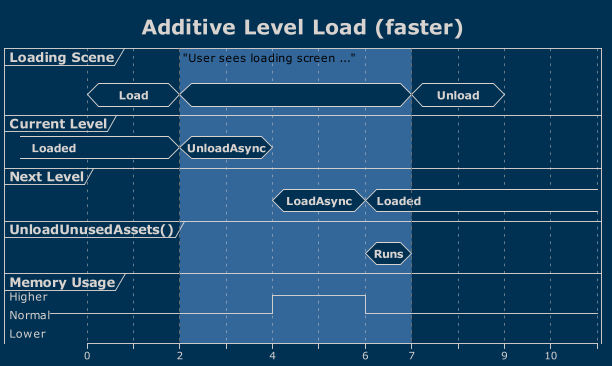
This speeds up level loading since shared assets will still be in memory. But it will also cause a memory spike during the load because we also keep the soon-to-be-unused assets in memory.
Use this approach if one or several statements are true:
- Levels share a lot of assets, or few but heavy ones.
- You develop for a platform with plenty of memory.
- Your game is not memory hungry.
In all other cases it’s best to try both options – with the above concept you can simply toggle a checkbox in the Inspector.
State Persists Naturally
Now what happened to the player and the HUD when changing levels the additive way?
Nothing!
Their state persisted automatically because they never get destroyed in the first place! This means they can all comfortable subscribe to sceneLoaded events in case they need to prepare for the next level.
Because you’d still have to reset some state, like position or cooldowns. But any other state like health, inventory, skill tree – that’s just going to stick around. Like it’s supposed to!
Furthermore, you do not have to “find” already established references to other global objects either. Only references to within the new level scene may need to be gathered.
Additive Scenes Allow Multi-User Editing
Additive scene loading is an elegant solution another challenge!
You can split a scene’s content so two people can work on the “same scene” simultaneously, when previously this would cause (unresolvable) merge conflicts with the .unity scene file.
A designer works on the platformer’s level layout (an additive scene) while an artist is simultaneously working on the parallax background layers, postprocessing FX and lighting (one or more additive scenes). They won’t get in the way of each other!
What If There’s Only One Scene?
Imagine the entire game, dozens of menu screens, hundreds of levels, thousands of dynamically instantiated prefabs – all hosted in a single scene!
Is that possible?
Yes, absolutely!
Is it a good idea?
Well, after …
- … reading all Netcode manual pages on scene management,
- the Unity manual pages on multi-scene editing,
- the user experiences on additive scene loading,
- and considering my own experience …
… I say we’re ready for:
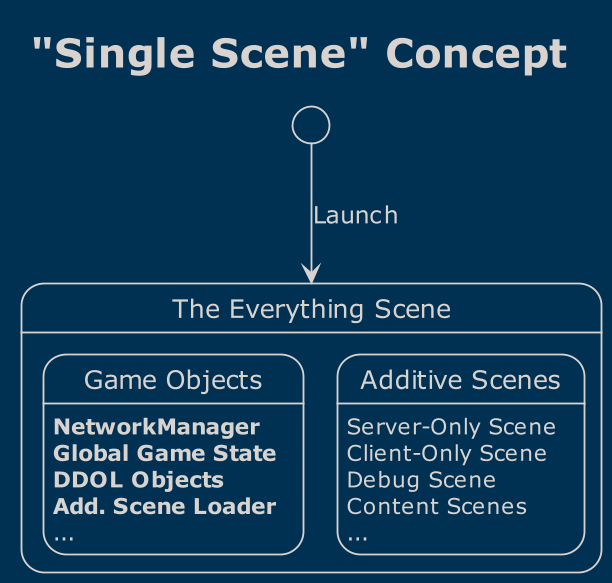
One Scene To Rule Them All!
I’m convinced a single scene is the best solution for our project!
It’s a hypothesis that I intend to prove. And backpedal if necessary. But all evidence points to this being ultimately the best way to work with scenes in Unity at the expense of a slight managing overhead.
It allows us to have truly global objects without having to resort to DDOL and we have more control over resource usage.
The Additive Scenes Todo List
To make this work, we likely need to create the following:
- Properly separating the content into additive scenes:
- Client-Only content
- Server-Only content
- Developer content (debugging, cheats, stats, etc)
- Game content (menu, levels, interaction, etc)
- Additive Scene Loader (Server and Client)
- Keeps track of loaded scenes
- Ensures scenes are not duplicated
- Content change transitions (ie level load)
- Implements a scene Unload strategy (caching?)
- Scene bundle specification
- A level or game mode may consist of multiple scenes
- Likely a ScriptableObject
- Perhaps a custom editor window
- Developer launch flags and settings
- To directly start a given game mode and level, for:
- Builds (command line), enter playmode, and unit tests
- Likely needs a configuration object (SO)
- Perhaps a custom editor window
- Automated Tests
- Integration tests ensure all the above functions correctly.
There may be some issues down the road, but they all seem to have proper solutions – manually updating Light probes for instance.
I feel it’s worth doing for the benefits of not suffering through object lifecycle-limbo: Objects get destroyed and instantiated again, events get unregistered or not, and generally event execution order woes.
Implement The Game Flow First
I’ll delay implementing all the features outlined above but focus on getting the single-scene concept to a working state with connecting clients together.
And disconnecting them. And reconnecting in other roles.
It’s crucial to create the complete game flow of going into and back out of online sessions first, as within that cycle lie many pitfalls.
We don’t want to be the developer who seemingly makes good progress but months later faces the issue that moving out and back into network sessions fails catastrophically in many ways.
About Those Cute Diagrams …
Yeah, I know, right? 🙂
I did not actually spend hours clickedy-click and draggedy-noooo!
The diagrams are created with PlantUML as “code” – the .puml sources are in the repo. I used the Rider PlantUML plugin to create diagrams in realtime interactively.
Learn more about PlantUML here. It’s a revelation!
Next …
Continue reading with 4. Netcode Statemachine
Return to the Write Better Netcode Overview
Source Code on GitHub (GPL3 License)
Join my Patreon – it’s free! Get the latest updates by email.
Leave a comment below if you have any questions or feedback!
Leave a Reply